Create your first campaign
Last updated May 11, 2026
Campaigns are how you organize influencer partnerships in Bondr. Each campaign is a spreadsheet-style table where you track influencers, their data, and outreach status.
Create a campaign
- Go to the Campaigns page from the sidebar
- Click New Campaign
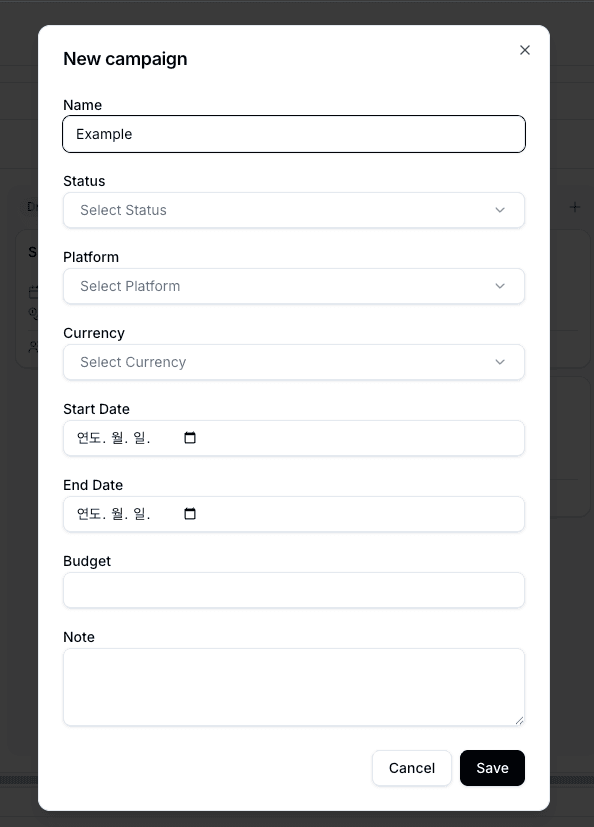
- Enter a campaign name — that's all you need to get started
The campaign list automatically includes system columns for campaign-level details: Name, Status, Platform, Currency, Start Date, End Date, Budget, and Note. Only the name is needed to get started, so fill in what is useful and leave the rest blank. Platform can be left blank, or you can select multiple platforms when a campaign runs across channels such as Instagram and YouTube.
What are system columns?
System columns are default columns that Bondr creates automatically so core features like campaign display, inbox linking, Kanban boards, and enrichment can work reliably. Because their names and types are connected to product behavior, system columns cannot be deleted, renamed, or changed to another type.
The influencer table inside each campaign also includes these system columns:
- Name — The primary name column for each influencer
- Email — The value used to automatically match inbox threads
- Status — Outreach progress and the basis for Kanban grouping
- Fee — A number column for proposed or agreed fees
- Profile URL — The social profile link used for search and enrichment
- Assignee — The teammate responsible in shared workspaces
You can edit cell values in system columns, and dropdown system columns such as Status can have their options adjusted. The column itself cannot be removed or reshaped like a custom column. In the table, system column headers use a darker gray background than custom columns, so you can use that visual cue to identify them. Add custom columns for anything else you need to track.

Add influencers
Once your campaign is created, add influencers to start tracking:
- Manually — Click Add Row and enter influencer details
- CSV Import — Upload a spreadsheet to add influencers in bulk
You can also add your own custom columns (text, number, date, or dropdown) to track anything specific to your workflow. Custom columns are not tied to core Bondr behavior, so you can manage their name, type, and deletion more freely.
Next steps
- Use Enrichment to auto-fill influencer profile data from social platforms
- Use Campaign guides to share briefs and content requirements
- Send bulk emails to reach out to your influencers